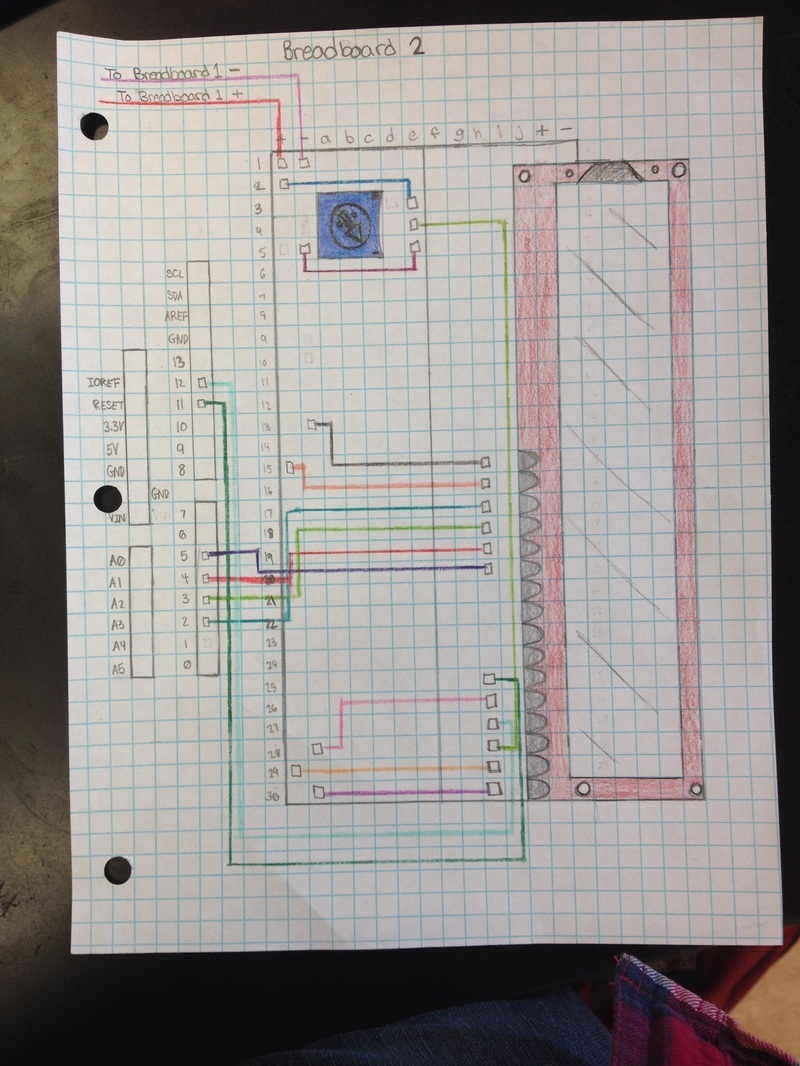
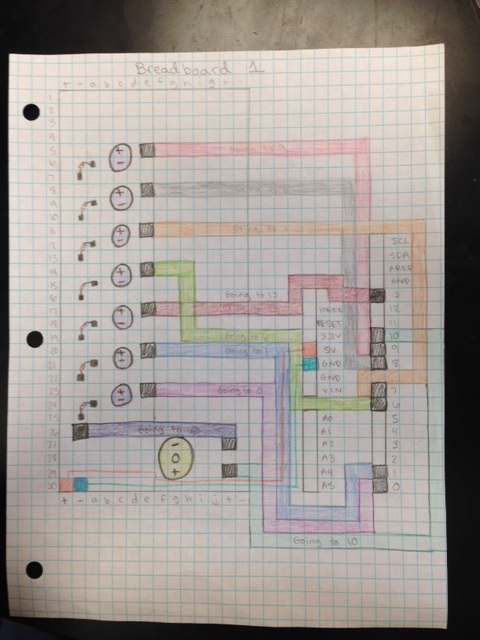
Our challenge for this this project was to create a robot art show. To create this, we explored circuits, resistance, current, voltage, and programming. We started the project off with going through a packet that was full of small experiments that helped us slowly understand different parts of electricity. It had my partner and I build small circuits to understand current and then slowly add more complex things to the circuit to understand voltage and resistance. After the packet was completed, we moved on to bread boards. To continue on from the bread boards, we had to pass a test. The test was to make a circuit with the bread board which makes an LED blink on and off at different speeds. My partner and I were able to follow the circuit diagram given and complete the circuit fairly easily. Once we were finished with the bread boards, we moved on to coding. For this, my partner and I used an "Arduino Board", bread board, and computer to program different things. The bread board was connecting to the computer and we were able to send codes through the Arduino program to the board. We were able to program lights to flash off and on in patterns, play a song on a buzzer, and spin a motor at different intervals. Once we went through all of this, we were able to design our project and create a robot art show.
My partner and I decided to have our board play the song "Cheap Thrills" on the buzzer. To have the buzzer play the song, we had to type in all the notes and beats for the song. Before the song played, it was introduced on an LCD screen. The screen said, "Liz and Lydia present Cheap Thrills by Sia. Enjoy!" This took awhile for my partner and I to figure how to code. We had a difficult time figuring out how to make the words on the screen switch, but eventually we were able to figure it out. After the screen said it's message, lights flashed. The lights were positioned in a straight line and flashed on after one another down the line.
My partner and I decided to have our board play the song "Cheap Thrills" on the buzzer. To have the buzzer play the song, we had to type in all the notes and beats for the song. Before the song played, it was introduced on an LCD screen. The screen said, "Liz and Lydia present Cheap Thrills by Sia. Enjoy!" This took awhile for my partner and I to figure how to code. We had a difficult time figuring out how to make the words on the screen switch, but eventually we were able to figure it out. After the screen said it's message, lights flashed. The lights were positioned in a straight line and flashed on after one another down the line.
|
|
Concepts
Circuit: a loop of conductive material from positive to negative sides of a power source.
Resistance: measure of how much the current is slowed/how many obstacles. Measured in Ohms (Ω)
Current: "flow" of electricity through a circuit. Measured in amps (A)
Voltage: potential energy drop across a component of a circuit. Measured in volts (V)
Power: rate at which electrical energy is transferred by circuit. Measured in Watts (W)
Reflection
This was a fun, but frustrating project. My partner and I worked really well together since we are close friends. We both contributed to the project, yet had fun. One thing I did well this time around was staying on task. My partner and I both focused on the project and were able to get a lot done during the day. If my partner and I were stuck on a problem I would suggest that while we wait for help from the teacher, we could move onto the next problem. This way we can still get things accomplished. Another peak of mine for this project was communication. My partner and I did a good job discussing each experiment through and letting each other know if we didn't understand something. One thing I can work on is not giving up. Working with circuits and codes was very frustrating and caused me to give up easily. I need to work on trying to find a solution for the problem and not give up so quickly. Another thing I can work on is patience. A lot of the time the circuit wouldn't work or the code wasn't right and my partner and I didn't know why. This caused me to get frustrated and impatient when we couldn't find out what was wrong. My impatience caused me to give up. Overall, my partner and I had a fun time learning about and creating circuits.
